Table of Contents
Difference Between Default and Custom Channel Groupings
Google’s Advice I Disagree With (And Why)
How to Customize Your Default Channel Grouping
How (And When) to Create Custom Channel Groupings
Good Custom Channels to Consider
Segmenting Branded and Generic AdWords Keywords
How to Find Mediums in Your Junk Drawer
Caveat
Don’t Be a Statistic
If you haven’t read my guide on campaign tagging, you’ll definitely want to do that. It provides some foundational understanding on what campaign tagging is,why it’s so important, how to rock it, and how to keep it from trashing your data. I also wrote a followup Google Analytics channels post to this demonstrating why customizing your channels is so important and walking through how I created a few of mine.
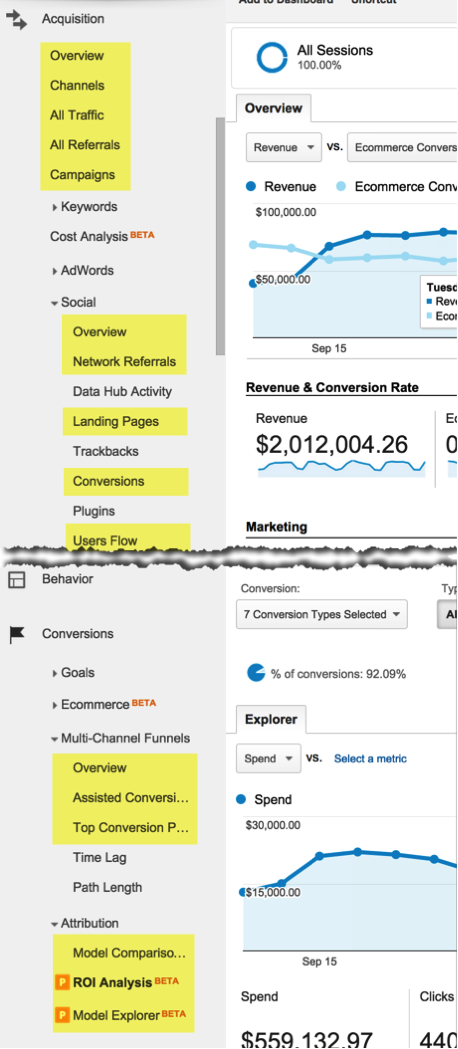
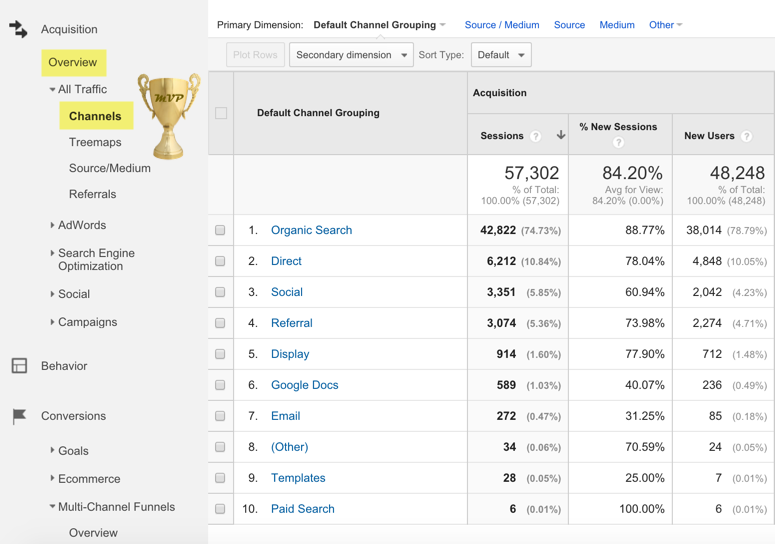
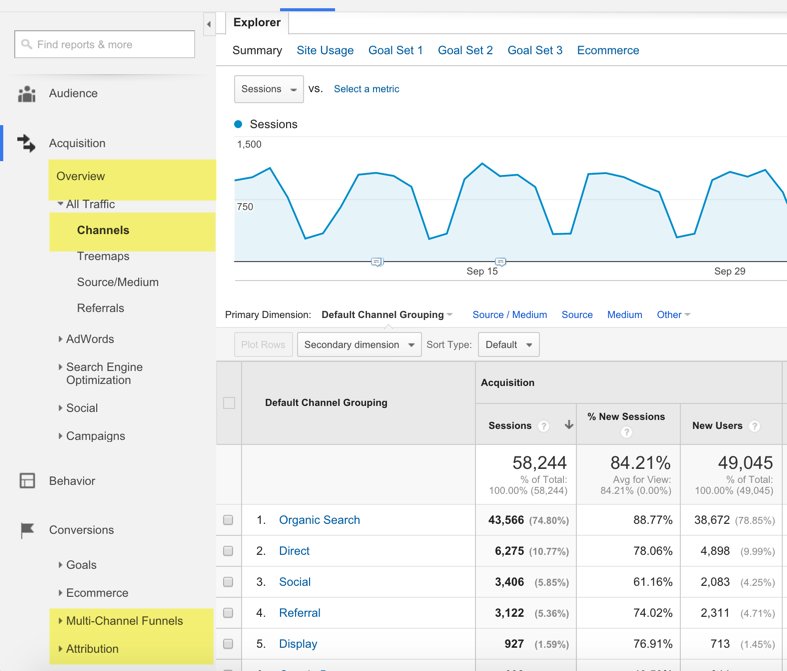
Spoiler Alert: The screenshot below highlights all the reports that are directly impacted by campaign tags. Campaign tagging is no trifling matter here.
Note: There are going to be lots of terms thrown around in here that aren’t terribly intuitive, like channels and channel groupings. Just think of channels as buckets and channel groupings as a collection of buckets. I think it will make everything I cover in this post a little easier to wrap your mind around. And I tend to use these terms interchangeably.
Difference Between Default and Custom Channel Groupings
So when you look at your view settings, channel settings get three reserved parking spaces, which can be a little confusing.
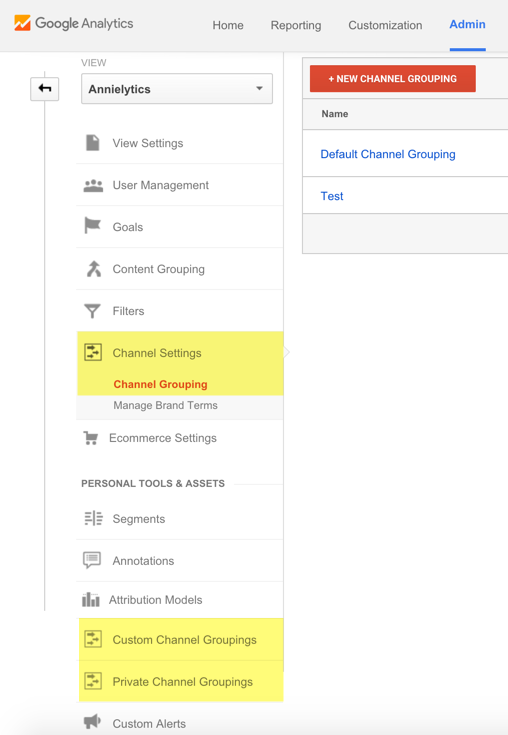
So let me start by explaining the difference between these.
Default Channel Grouping
It is my opinion that this is the most important channel grouping settings to get right. There are a few things you need to know about the Default Channel Grouping:
- This is the only customizable channel grouping that’s available via the Google Analytics Core Reporting API. If you’re using the API to build dynamic dashboards like the ones I build in my dashboard course, this is a critical consideration. And if you equate accessing analytics data from the Google Analytics website with going into a bank lobby to get $20 cash (like I do, as well as other data snobs I know), this is huge motivator to learn how to customize your default channel grouping [responsibly]. You can always create a Test view (something else I recommend) and test your channel definitions there before touching your main view.
- Modifying the default channels permanently changes the raw data for new sessions by altering how Google Analytics labels incoming traffic.
- It’s the primary dimension for my favorite report, the Channels report (Acquisition > All Traffic > Channels). But it’s also the primary dimension for the Acquisition Overview report.
- Modified default channels are viewable to all users of the account, not just the user who modified them.
- You need Edit access to modify default channels.
- Changes you make to the default channels don’t apply to historical data.
Custom Channel Groupings
The custom channel grouping is for the timid analyst (or the analyst who doesn’t have adequate access to modify the default channel grouping). This option gives you the ability to create a fully customized group of channels. If that sounds like it’s a statement of the obvious, there’s a good reason for that: It is.
Here are a few other notables about this feature:
- These only affect the display of your data, not the underlying data itself.
- Anyone with access to your Google Analytics view can create them. All you need is Read & Analyze view permission.
- They can be applied to historical data. This is pretty huge, especially if you’re comparing attribution models (which is what I primarily use custom channel groupings for).
- Where the default channel groupings can only be used with the Acquisition Overview and Channels reports (which both use the Core Reporting API), custom channel groupings can ALSO be used in the Multi-Channel Funnel (MCF) reports and Attribution reports (which use the MCF API). You can see the reports you can use custom channel groupings in highlighted below.
- Custom channel groupings only show up in the account for the person who created them, unless they share them.
Private Channel Groupings
UPDATE: Google quietly removed this option from Google Analytics.
Google gives us a third option, but I’m going to be really honest. I don’t see the point. These channel groupings are only available in Acquisition reports (so not in the MCF reports), and you only need Read & Analyze access to create them. But you can share them (just like custom channel groupings). They’re also only viewable to the user who set them up, and they’re not available via the Core Reporting API.
I don’t see anything in this option you can’t get via the custom channel groupings. Custom channel groupings are available in Acquisition and MCF reports. That’s like a sweet BOGO deal. So why would you create a channel grouping that’s only available in one set of reports, with all the same limitations of custom channel groupings? That’s like leaving the free portion of the BOGO deal behind.
Google’s Advice I Disagree With (And Why)
It’s no secret that Google would rather that we not go tinkering with their infrastructure. But they give us the ability to screw up modify our settings that actually redefine how our data is categorized, if we so choose. I’m actually a huge fan of redefining how data is classified. Because, hey, no one lives forever!
But these changes should only be made by experienced analysts who know what they’re doing. If you don’t know what you’re doing, read this guide carefully, create a test account, call it Phoenix, blow it up, restore it, rinse, repeat. Get a tat to cover your scars. Now you’re ready to modify your default channel grouping. 🙂
With that HUGE disclaimer out of the way …
What Goog Says
The default channels meet the needs of most Analytics users, but if you have specific analysis requirements and want to label your traffic in other ways, you can create a new Channel Grouping (recommended) or edit the Default Channel Grouping (About Channel Groupings).
What I Say
The default channels doesn’t come close to meeting the needs of most analytics users, but if you have specific analysis requirements and want to label your traffic in other ways, you can create a new Channel Grouping (if you want to be a wuss or your boss/client doesn’t trust you with Edit access) or edit the Default Channel Grouping (recommended).
Why
For me, the only good reason to use the custom channel groupings option is if I want to apply them to my data retroactively, which is really helpful when comparing attribution models. But as long as these custom channels aren’t available in the API, I have little use for them beyond that. YMMV (as may your opinions).
How to Customize Your Default Channel Grouping
I touched on customizing default channels in my campaign tagging guide, but we’re going to take a deeper dive here. Remember you’ll need Edit access to your Google Analytics account to be able to make these modifications.
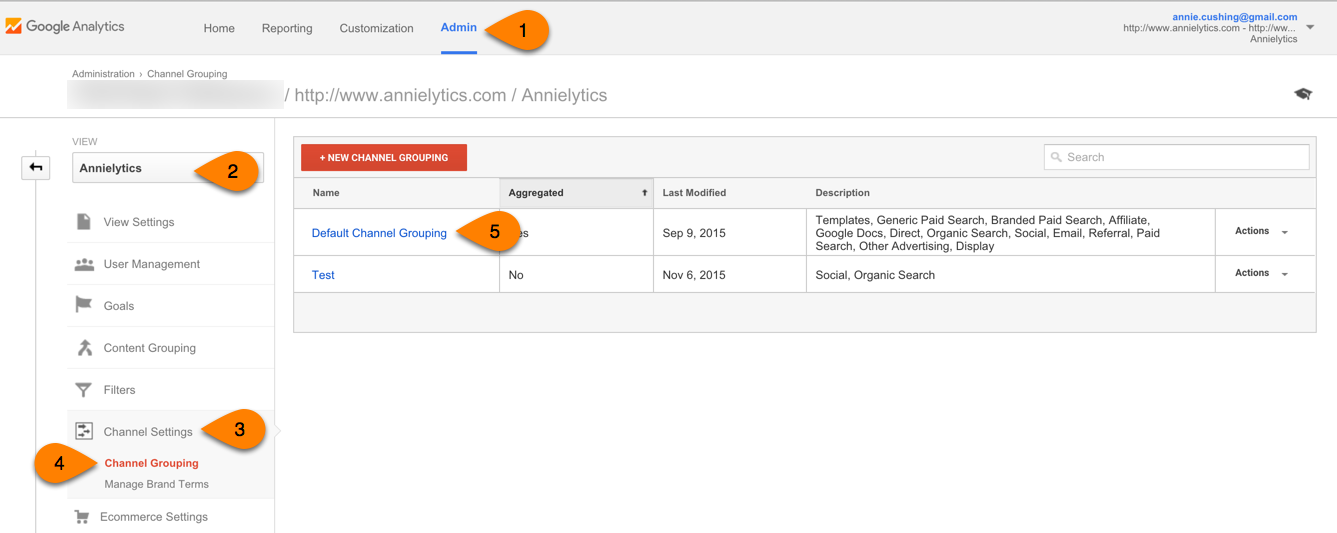
Step 1: Go to Admin > View > Channel Settings > Channel Grouping > Default Channel Grouping.
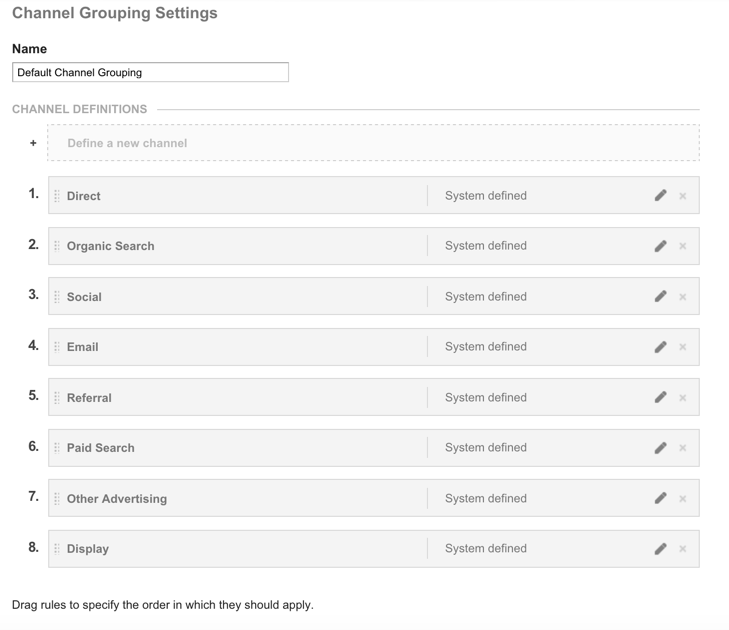
This is what the default channels look like in their virginal state:
Notice all those “System defined” labels? That means this channel has been completely defined by Google. If you want to see how each of these channels is defined check out (and bookmark!) this resource. This isn’t a mere academic resource. It’s HUGELY important. So much so, I really wish Google would embed these definitions in contextual help menus that are available when you customize a channel.
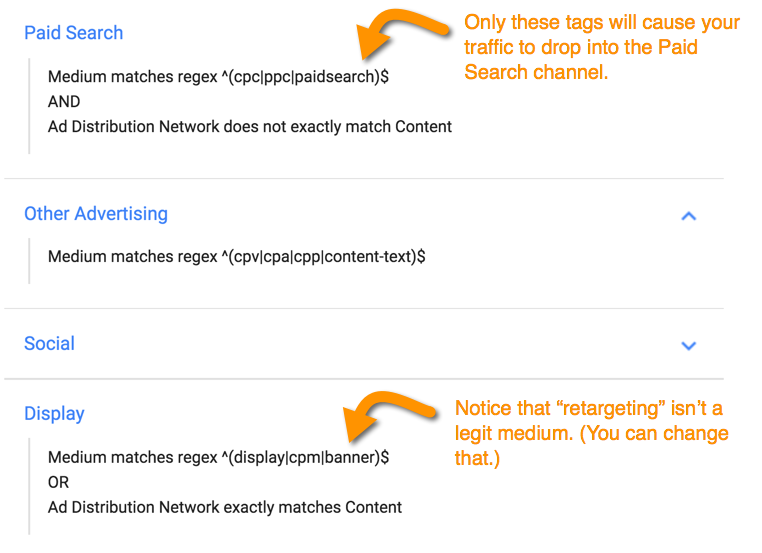
Until that happens, you should keep Google’s Default Channel Grouping channel definitions open in another tab when you’re customizing your channel definitions. When you dig in, you’ll see really important distinctions like the ones below:
This is what my [not-so-virginal] channel definitions look like:
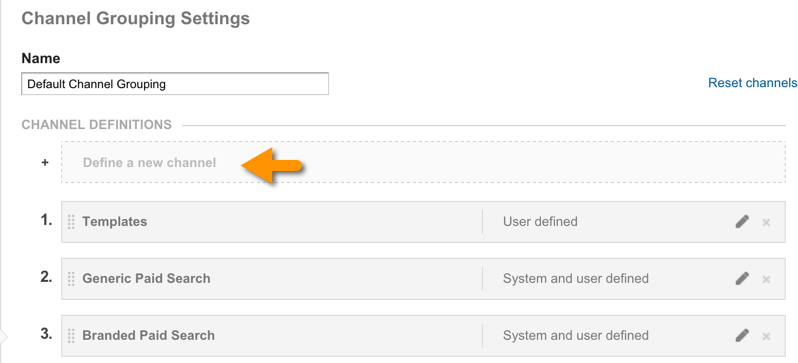
When you customize a channel definition, you’ll see either “User defined” by itself (like you see with my Templates channel), “System defined,” or “System and user defined.” The third category just means I retained the system definition but tweaked it a bit.
[If you want to tweak a system-defined channel, move on to Step 2. If you want to create a channel from scratch, skip to Step 5.]
Step 2: If you want to tweak a system definition, click the pencil icon.
Step 3: Choose your operator. Use “OR” if you want to open your definition up to new possibilities. Use “AND” if you want to restrict it more (because both conditions must be true for your channel to be defined). I use OR more frequently but do use AND on occasion. (You’ll see one below when I set up a Partner channel.)
Step 4: Set up your rule using a coupling of a dimension and value. In the example below, I customized the Email channel to also include sessions tagged medium=Email (with a capital ‘E’). This is actually very important to do, btw! Silly as may seem, if you use capital letters in ANY of your medium tags (utm_medium), your traffic will fall into the God-awful “Other” channel (Google’s junk drawer, where data goes to DIE).
Here’s an animated gif of how you would modify the Email channel definition to allow capital letters.
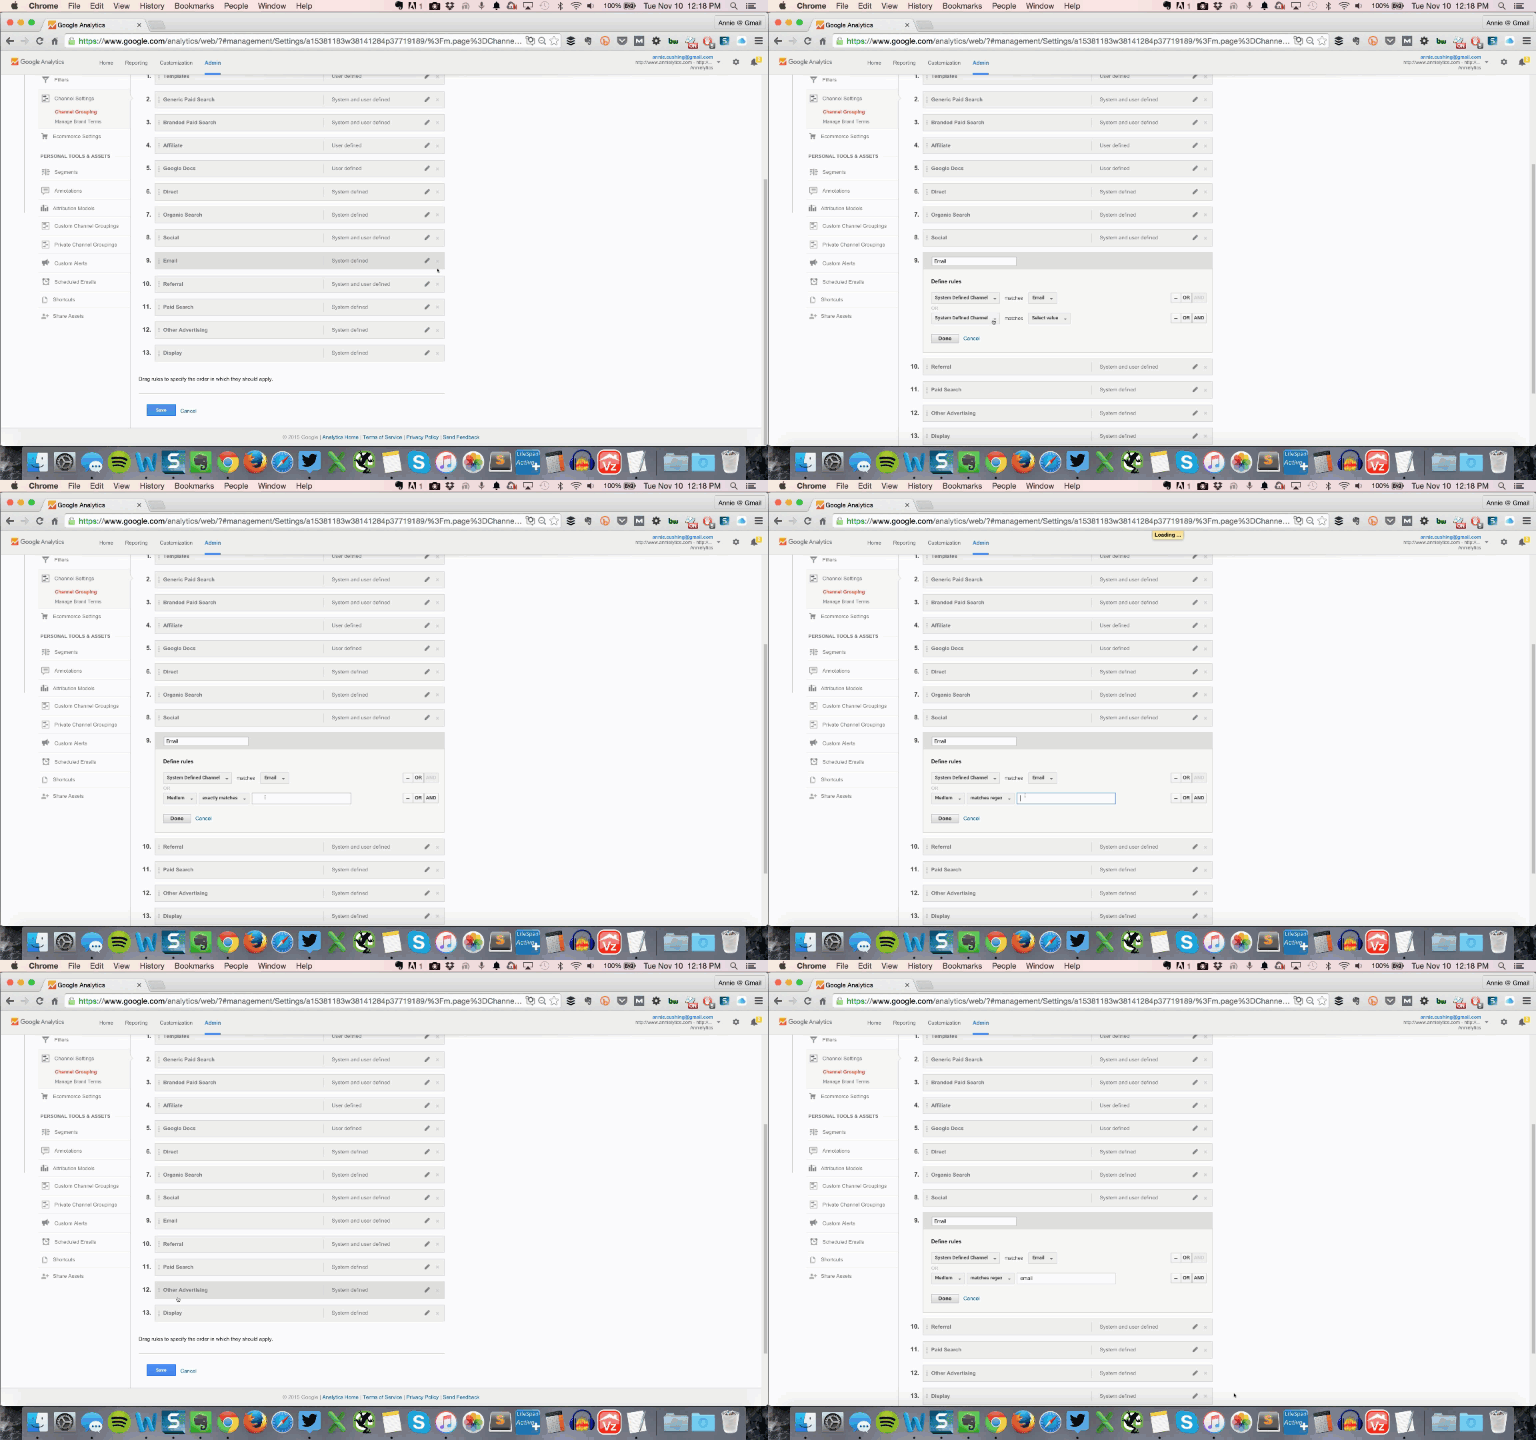
Choosing the matches regex option is a great way to make a value not case sensitive. If Google would have used the regex option when defining these channels, they wouldn’t be case sensitive. I can’t tell you how much traffic I’ve seen needlessly routed into the Other bucket because someone used a capital letter(s) in his/her tag.
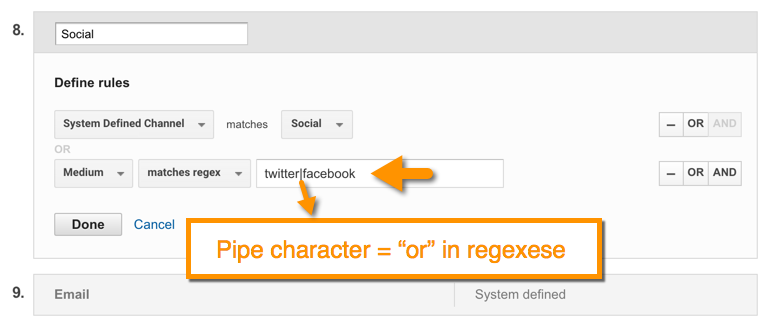
You can also use regular expressions in your custom definitions. (If you’re new to regex, I wrote a regex guide for newbs.) This will process faster than using multiple “OR” operators. Plus, you only get 20 conditions per channel definition, so if you’re creating a custom channel for, let’s say, your affiliates, you’ll hit that limit pretty fast (as one analytics audit client found out recently).
Step 5: To create a new channel, click the Define a new channel box at the top of the channel definitions.
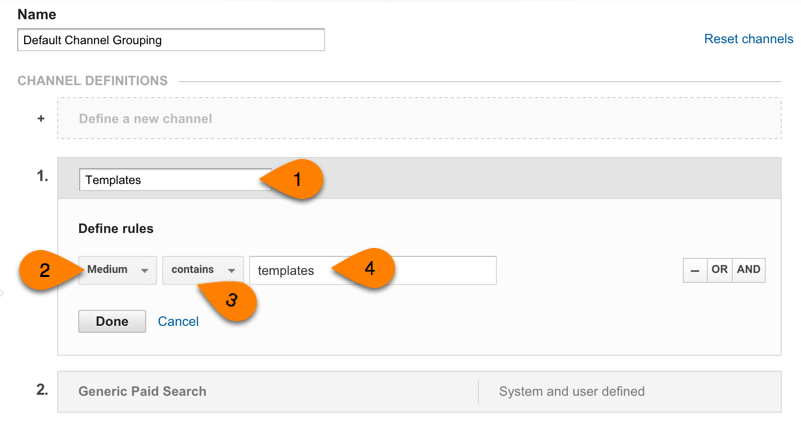
Step 6: Define your channel. Here’s how I set up one of my custom channels to track visits from people who click through from either my DIY site audit or analytics audit template (inexpensive resources for marketers that walk them step by step through a site or analytics audit). If I didn’t tag these links, because people are clicking through to my site from a Word document, these visits would show up as direct traffic.
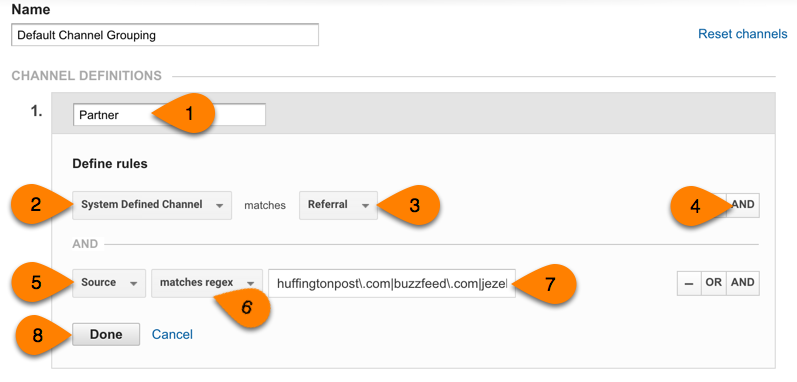
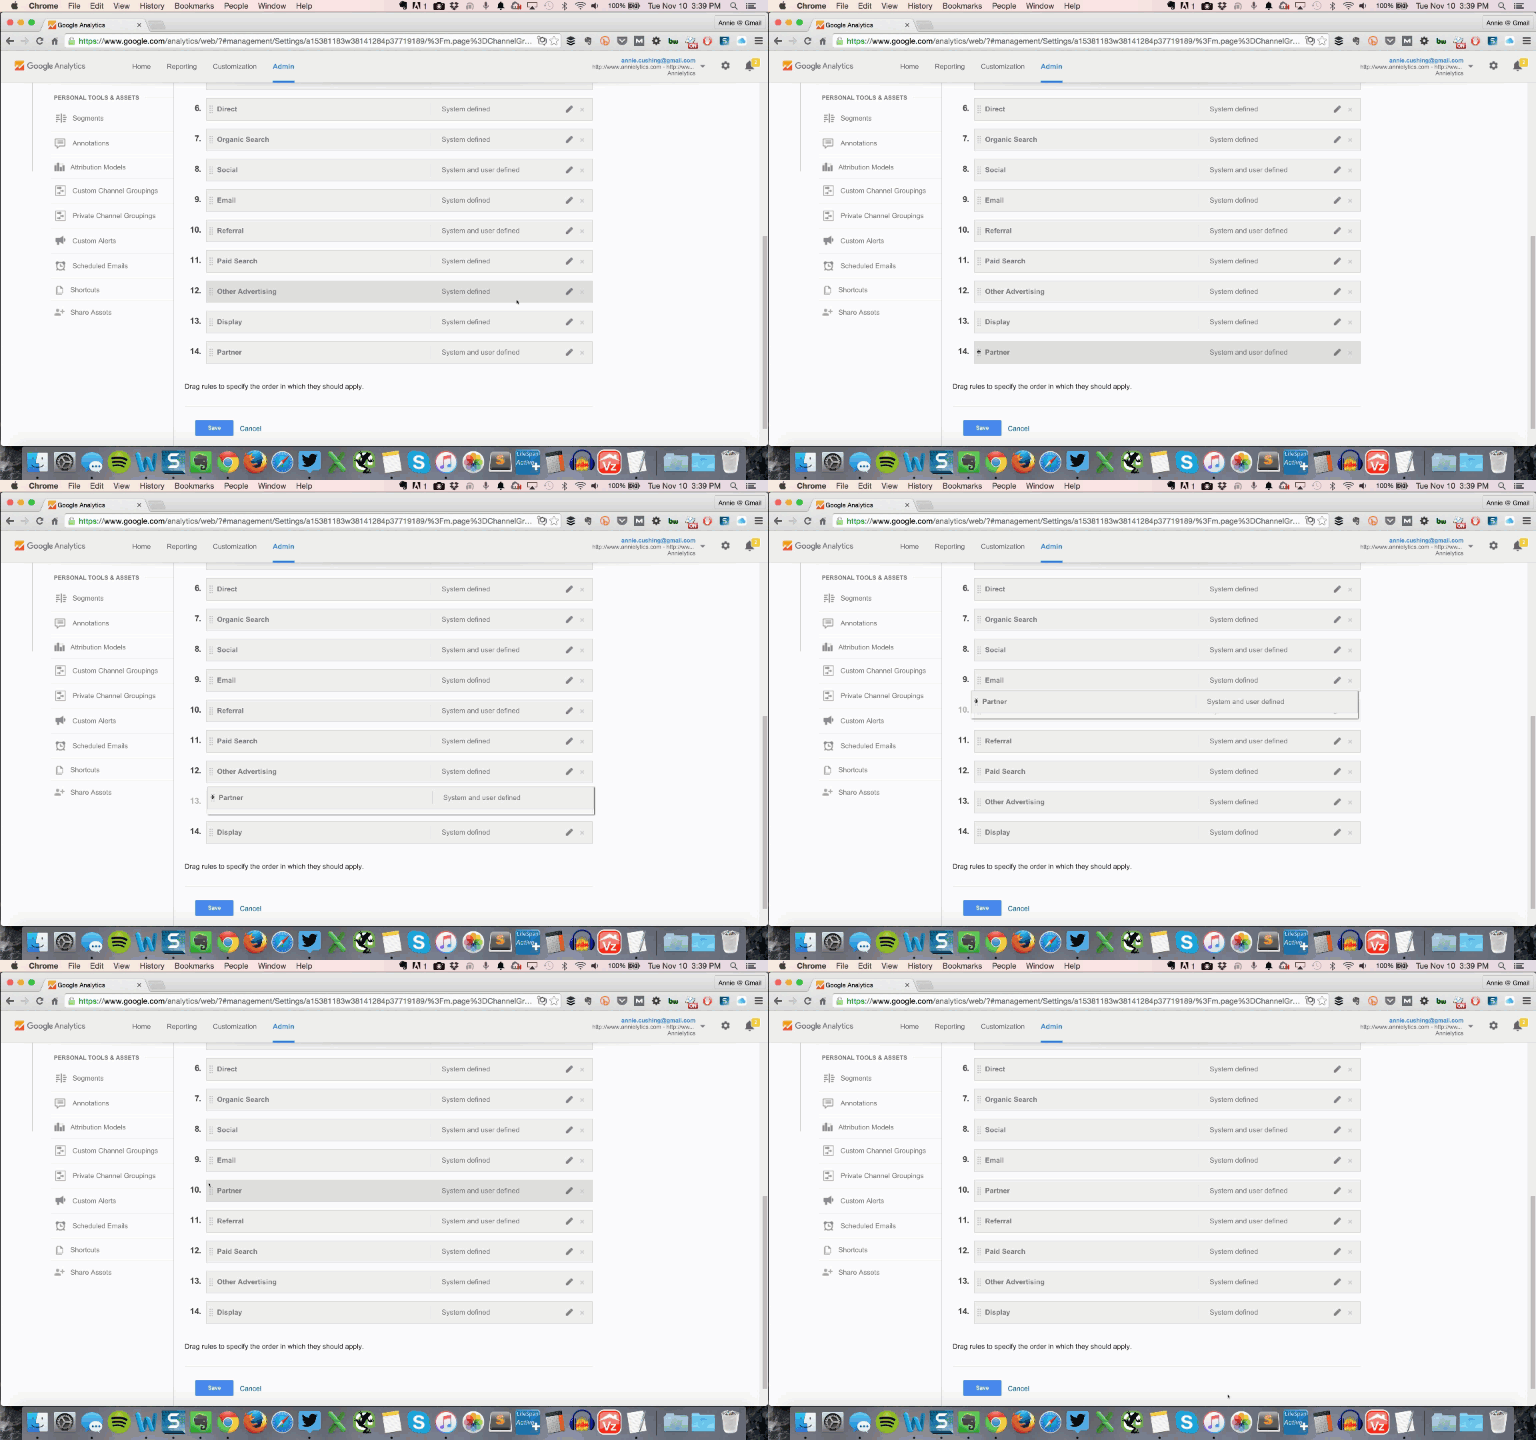
Step 7: Adjust the order to make sure your traffic shows up in the proper channel. As a general rule, you want to put your more specific channels at the top of the stack. For example, let’s say you wanted to create a custom channel for your syndication partners. (I do this a lot for publishing sites.) You could create your channel by combining a system-defined channel (Referral) with a custom rule that uses regex to match your partners. (There are more sophisticated ways to do this using a tag manager, like Google Tag Manager, but it’s outside the scope of this guide. But if someone wants to write that post, I will happily link to it!) It might look something like the screenshot below.
This is a solid channel definition, but if it sits below your Referral channel, these sessions won’t be routed into your Partner channel because Google puts it into the first bucket that resolves to TRUE. So because these partners all fall under the system defined channel of Referral, they would fall into the Referral bucket. To get visits from your partner sites into your Partner channel, the Partner channel definition has to appear above your Referral channel. Then whatever is left over after weeding out these sessions will get funneled into your Referral channel.
To move a channel, just hover over the the handle to the left of the channel card and click-and-drag it where you want it.
How (And When) to Create Custom Channel Groupings
When to Use Them
Custom channel groupings are ideal if you:
- Don’t have Edit access.
- Don’t want other users with access to the view to see your channels.
- Want to apply the new channel definitions to historical data.
- Don’t need to access them via the API.
- Don’t want to permanently alter your channel data.
- Want your channels to be available to you in your Acquisition and MCF reports.
How to Create Them
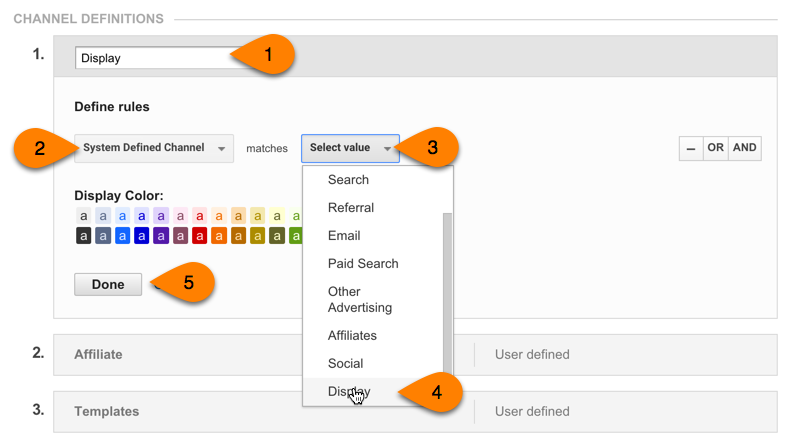
Pro Tip: Don’t follow Google’s instructions. Technically, they’ll work, but there’s an easier way. If you follow Google’s instructions you have to create ALL of the channels by hand. I think it’s easier to start with a channel grouping (like the Default Channel Grouping) and modify it. There’s no sense having to redefine standard channels like Direct.
But if you ever have to do this — as penance for not replacing the toilet paper roll you emptied or eating your kids’ Halloween candy while they’re at school — make sure you use the System Defined Channel dimension. With it, you can just choose from one of the default channels that comes out of the box with Google Analytics or one of the channels you’ve defined in your Default Channel Grouping.
Okay, so here’s the easier way …
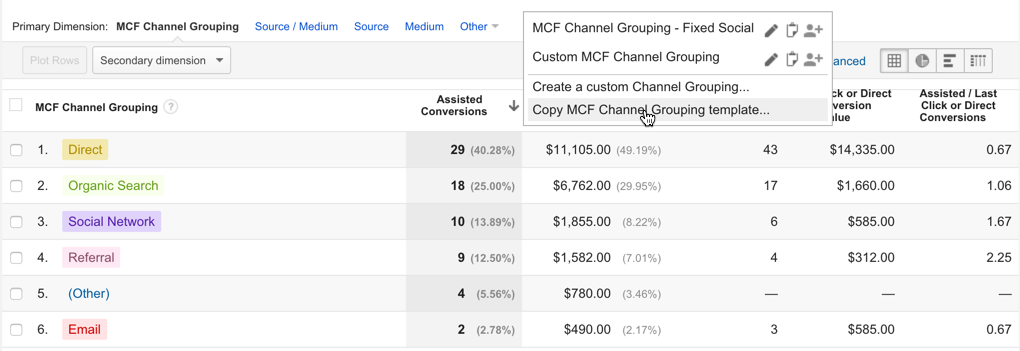
Step 1: If you’re creating your first custom channel grouping, go to Conversions > Multi-Channel Funnels > Assisted Conversions — or any MCF report where you can access the Channel Groupings primary dimension (Assisted Conversions, Top Conversion Paths, Model Comparison).
Step 2: Under the Primary Dimension, click the Channel Groupings drop-down and choose Copy MCF Channel Grouping template.
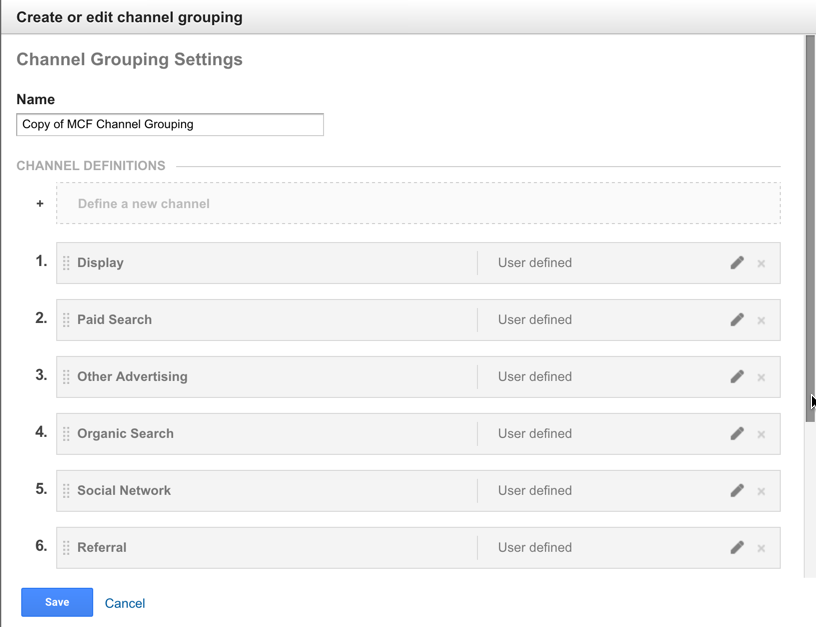
Now you’ll have all the default channels already created, and all you’ll have to do is modify them.
This is a much more efficient workflow than starting from scratch.
Step 3: As we saw earlier, drag your channels around to make sure they’re processed correctly (specific to general).
Step 4: Save your new channel grouping.
Free advice: Create your custom channels here. Use it as your personal playground since you can’t permanently screw anything up, and you can apply custom channel groupings to historical data. Once you’ve verified everything is copacetic, use these channel definitions as a template to modify your Default Channel Grouping. I’ll have two browser windows open and just toggle back and forth between them.
How to Share Them
If you want to share your custom channel grouping, you can do that a couple different ways:
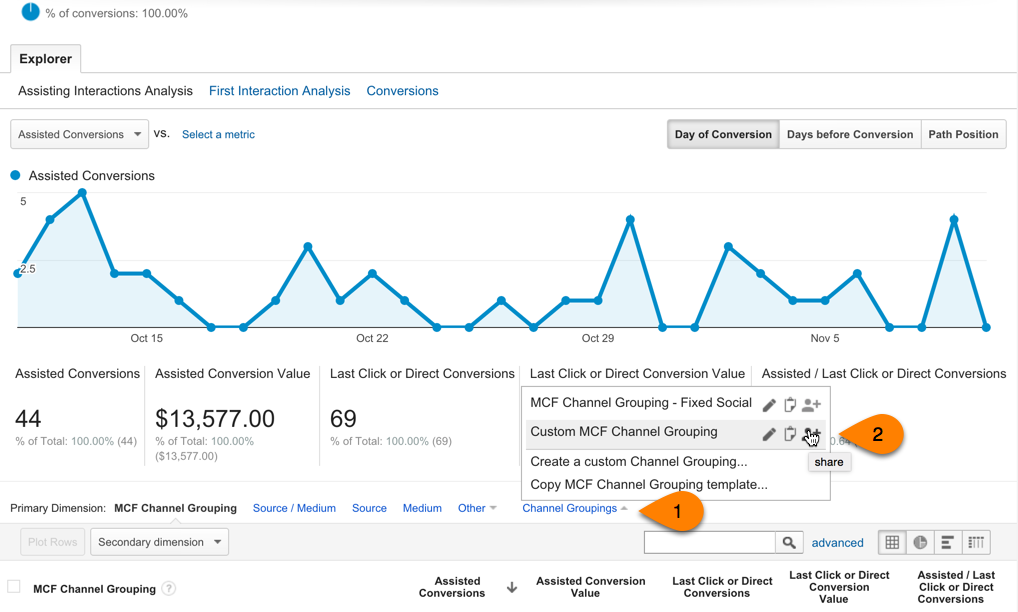
Option 1: In any MCF report where you can change the primary dimension, click the Channel Groupings drop-down menu, and click the Share icon.
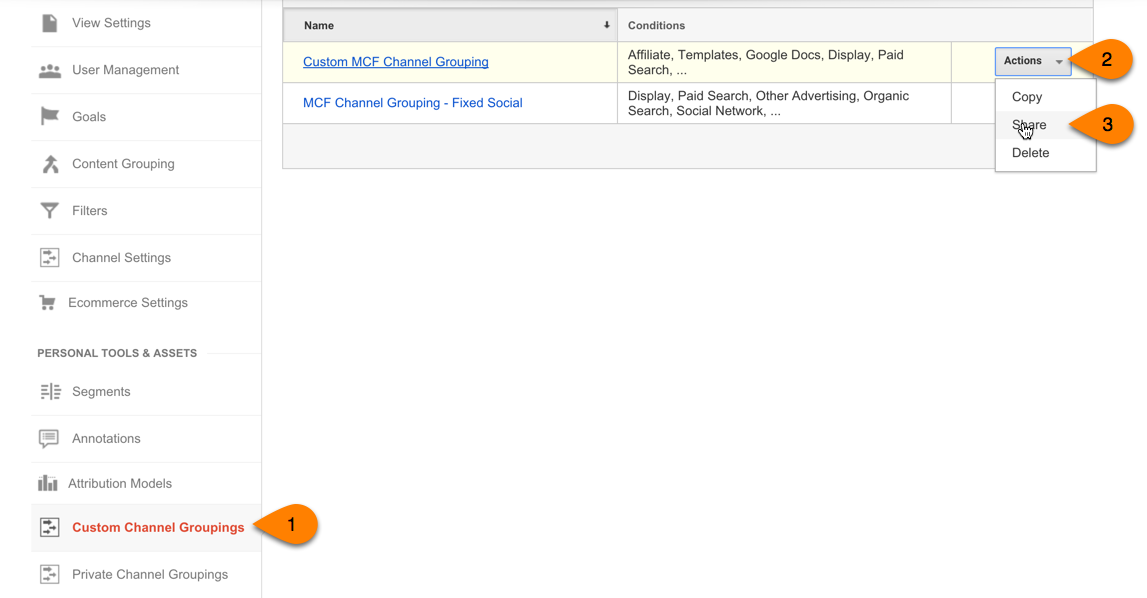
Option 2: Go to Admin > View > Personal Tools & Assets > Custom Channel Groupings > Actions drop-down menu > Share.
Good Custom Channels to Consider
I provide a list of custom mediums you might want to consider using in your campaign tagging in my campaign tagging guide (under Medium). Any medium you use is potentially a good channel. It just depends how important it is to your business. For some mediums it makes sense to combine them into one channel, as Google does with ppc and cpc. But other times it makes sense to give them their own channel.
Here are some I’ve recommended for clients or used myself:
- Paid Social: Google doesn’t offer a default channel for social ad campaigns. I don’t recommend using cpc. I explain why here.
- Partner: Huge for publishers with syndication agreements. You don’t want this valuable traffic to get lost in your Referrals report.
- Retargeting: Some sites choose to lump retargeting traffic into their Display channel. Just use one of the approved mediums (display, cpm, or banner) or add your custom medium to the Default Channel Grouping for Display. Personally, I lean toward making it its own channel. Keep in mind you could potentially still use the display medium but differentiate your retargeting ads via another parameter, like the content parameter (utm_content=retargeting). Then you would use content in your channel definition — or a combination of your medium and content if you want to be extra careful.
- Affiliate: List your affiliate sites using regex. [UPDATE: Google Added an Affiliate channel since this guide was written, but it only uses campaign tagging. It’s a good idea to also add your affiliates’ domains using the Source dimension as well.]
- Press Release: List sites you publish your press releases to.
- Lead Gen: List your (or third-party) lead-generation sites that drive leads to your site.
- Ebook: Tag links in your ebook with a medium set to ebook, and add this as a custom channel.
- PDF: Same idea as ebook.
- Presentation: Tag links in your presentations that you make available for download or post to Slideshare.
- Google Doc: My custom channel for visits from free resources I’ve made available like my Hundreds of Tools for Marketers Google Doc.
- TV: Doing a TV commercial? You could use a vanity URL that redirects to a page on your site with campaign parameters that include utm_medium=tv. Then you could use that as the basis for your TV channel.
- Widget: Make a widget available for sites to host? Tag it with a medium set to widget and use that as the basis for your custom channel.
You get the idea. It really comes down to how you want to slice and dice your data. Any traffic you devoted dedicated efforts into accruing should be probably be accounted for with its own channel.
What you DON’T want to do is base a channel on URLs. I’ve seen clients create a “Leads” or “Member” channel based on a URL that’s visited during a session. This is going to be a bad idea because URLs are like viruses; they get around. (I exercised restraint in that analogy.) The chances are good someone can arrive at that URL via any number of [legitimate] channels because your PPC landing page was indexed by Google or shared on Facebook.
Segmenting Branded and Generic AdWords Keywords
Why You Should Do This
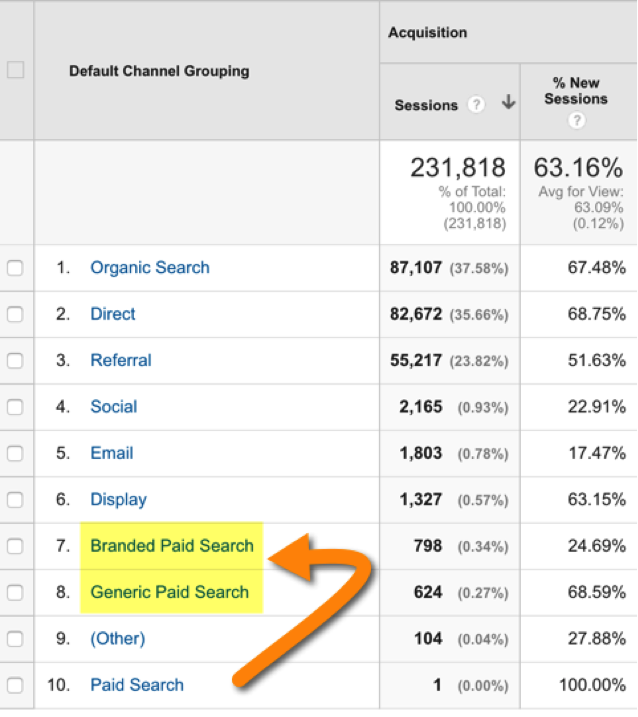
If you’re bidding in AdWords, you have one more option for your Default Channel Grouping. It’s gotten very little press time but is a really cool feature. Instead of just having a Paid Search channel, you can divide that channel into your branded and generic keywords.
Personally, I think this is a brilliant feature Google quietly added. You can see in the screenshot below how the Paid Search channel gets divided into a Branded and Generic Paid Search channel.
Since branded campaigns tend to perform much higher, it’s really good to separate out that data so that you can get a more accurate reading on how effective your PPC efforts are.
How to Set Up
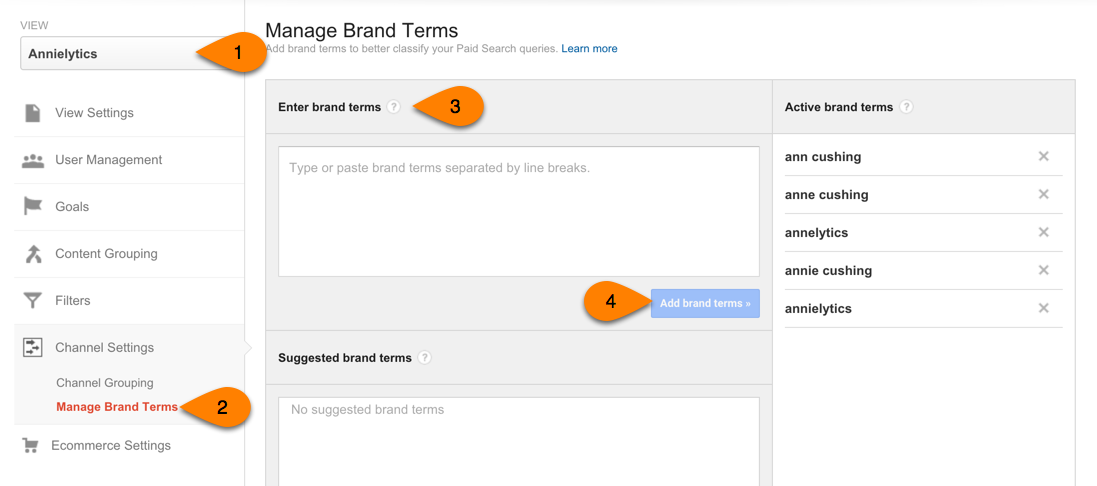
Step 1: Navigate to Admin > View > Channel Settings > Manage Brand Terms.
Step 2: In the Enter brand terms text box, type or paste terms that describe your brand, then click the Add brand terms button to add these terms to your Active brand terms list.
You can see the terms I used to create my brand terms. (Google alphabetizes them for you.)
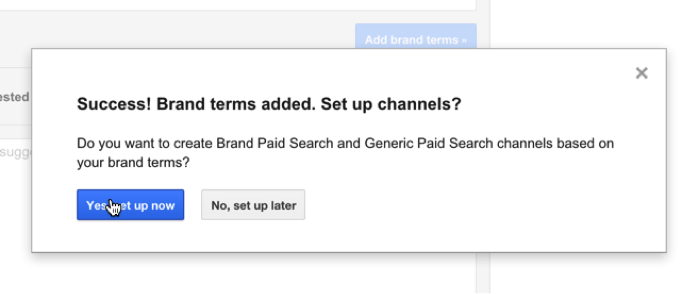
Step 3: The first time you add brand terms you’ll get a prompt that asks if you want to create Brand Paid Search and Generic Paid Search channels. There’s no time like the present to set up your Brand and Generic channels.
Step 4: Mark this change in your annotations. If you don’t use your annotations (tsk tsk), I explain how and why to use them here.
How to Find Mediums in Your Junk Drawer
I hate, hate, hate to see any data in Google’s Other channel. Like I said earlier, this is where good data goes to die.
Are you tagging your social links with a medium of twitter or facebook?
Dead.
Are you using capital letters in your mediums?
DOA.
Are you using a medium Google doesn’t recognize?
Goner.
Find Mediums Google Can’t Decipher
I go through these steps with every analytics audit I do.
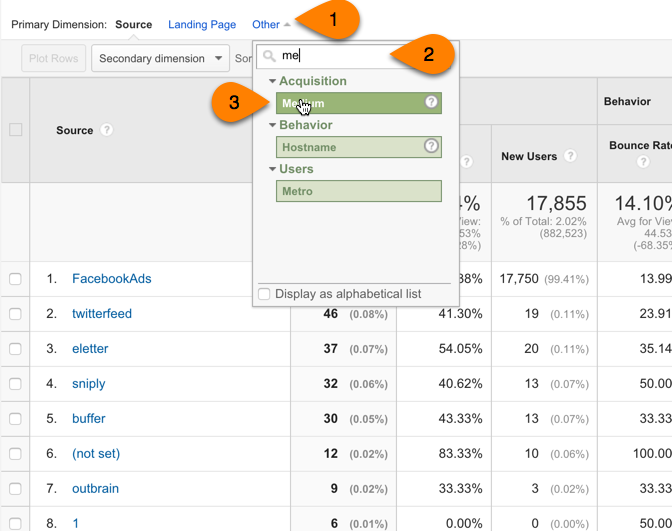
Step 1: Navigate to Acquisition > All Traffic > Channels > click on (Other).
Step 2: When you click through to the (Other) channel, the default primary dimension is Source, which is pretty useless to us for this research. Change it to medium.
As I mentioned in my campaign tagging guide, medium is, hands down, the most important channel to get right in your tagging, which is why we’ll focus our attention here.
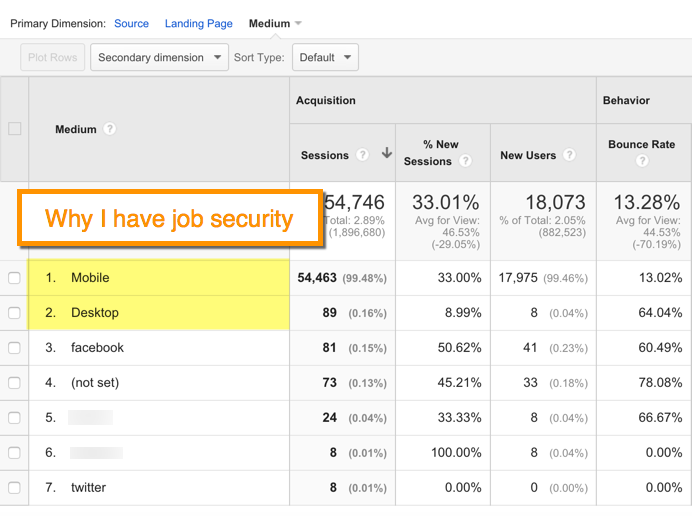
Step 3: Go to task on the mediums you see here. Google considers the ones that show up here freaky mutant mediums, and they don’t inherit the same rights as the mediums it recognizes.
I wish I could say these bizarre mediums like the Mobile and Desktop mediums displayed above were a one off. It’s rare I don’t find mis-tagged mediums when doing an analytics audit.
But this is how to flesh out your mediums Google can’t decipher. You probably won’t be able to get rid of the (Other) channel altogether because sometimes other sites will tag links that point to your site. But you should aim to rid this rogue channel of as much data as possible.
Solution: Change your campaign tags and customize your default and custom channel groupings to take in these data refugees.
Check Channel Grouping for All Tagged Mediums
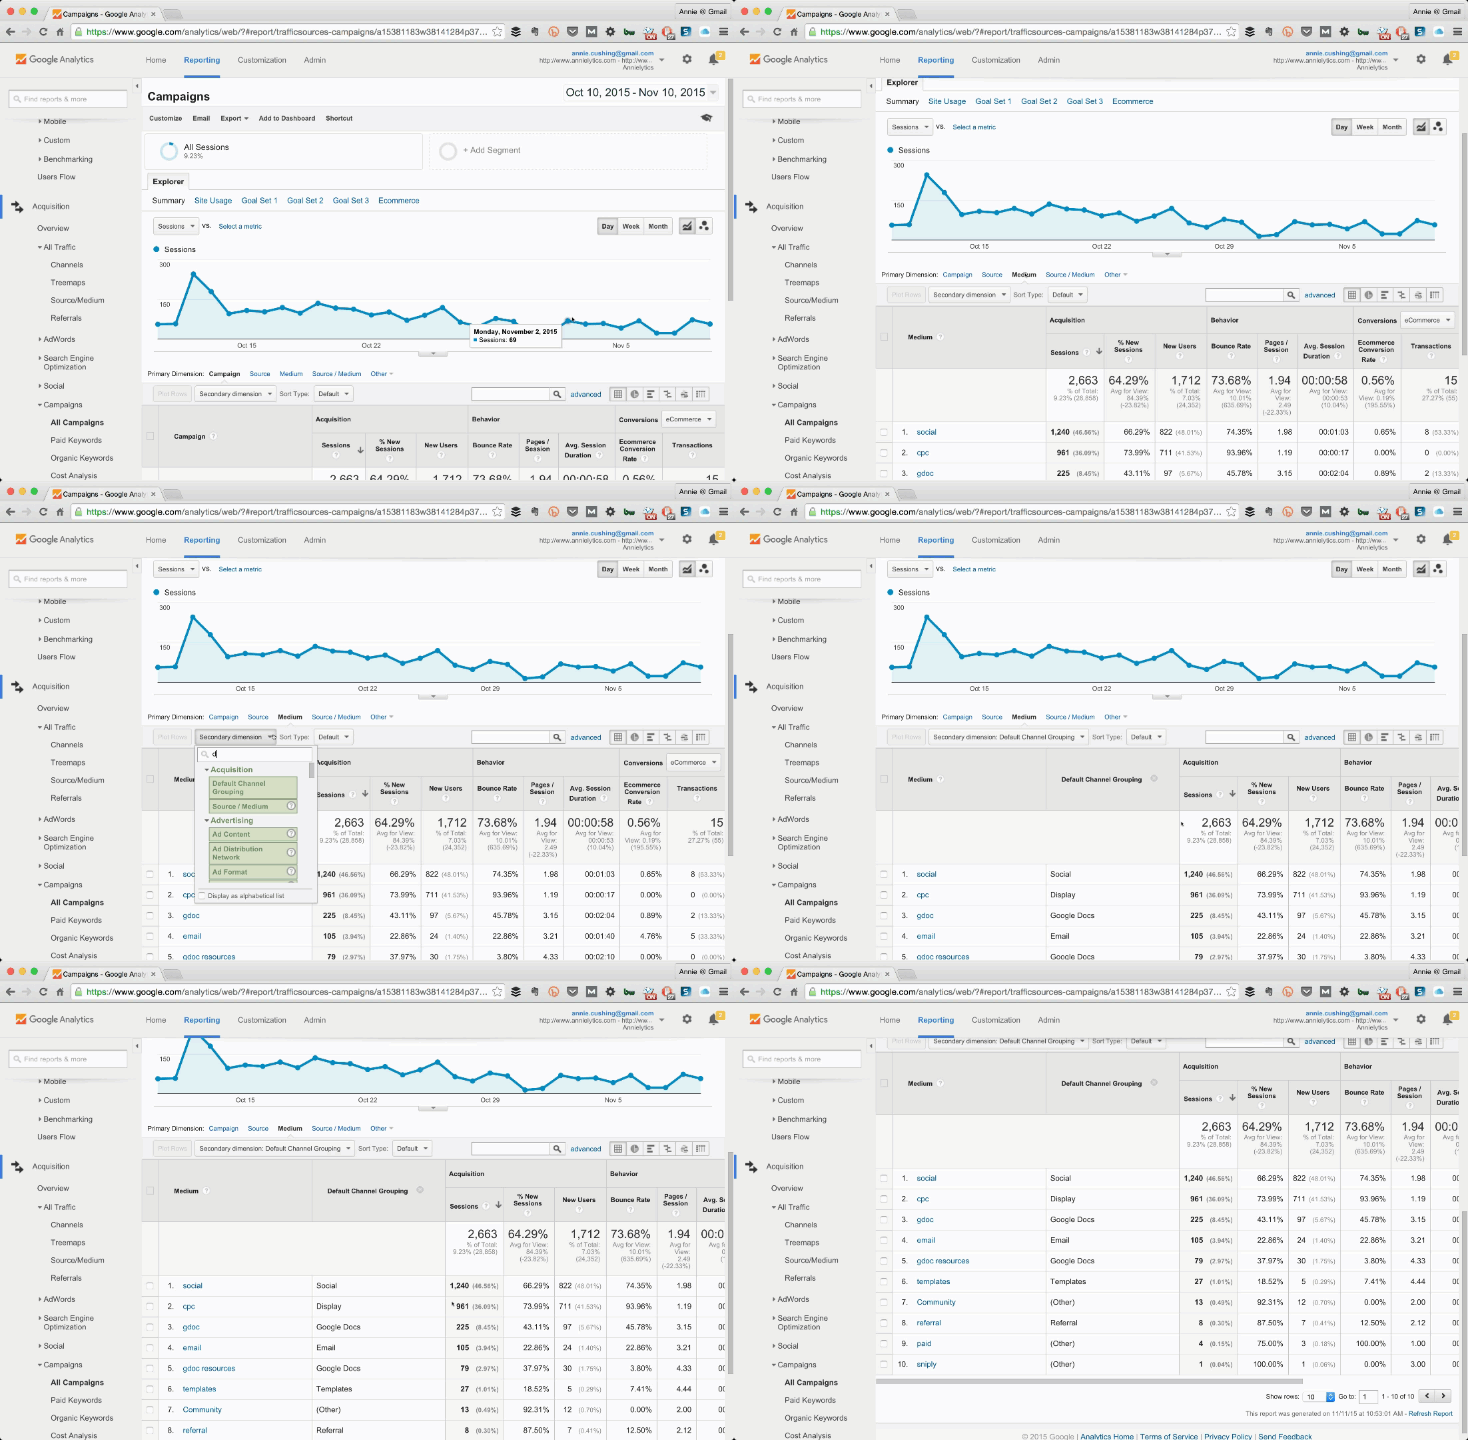
It’s also good to run a test of your tagged mediums to make sure they’re being routed to the correct channel.
Step 1: Navigate to your Campaigns report (Acquisition > All Traffic > Campaigns > All Campaigns).
Step 2: Change the Primary Dimension to Medium.
Caveat
Channel Groupings use raw, pre-filtered dimension values to classify a session into a channel. So if you’ve used view filters to redefine a medium or any other dimension you later use to define a channel, you’ll need to use the original values.
For example, let’s say you use a Search and Replace filter to rename your banner medium internal ads. If you try to funnel your internal ads medium into your Display channel by modifying your Default Channel Grouping to target this medium, it won’t work. You will have to use the original banner medium.
Don’t Be a Statistic
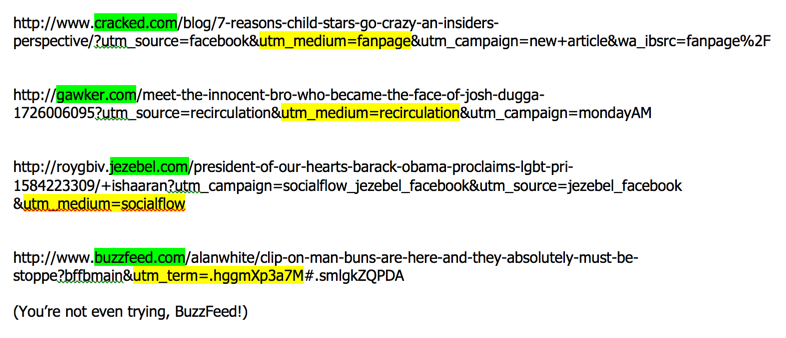
This is a lot to take it, but getting channel groupings set up correctly is really important to measuring your marketing campaigns. When I see campaign tagging from major publishers hacked like the ones below, I imagine their burgeoning (Other) channel that most likely goes completely unnoticed and robs those managing their social media of the credit they deserve.
So don’t let rogue campaign data rob you of the credit (and raise) you deserve!
Related Posts
I also wrote these posts to provide additional guidance on customizing channel groupings in Google Analytics:
- Why You Want to Customize Google Analytics Channels (And How)
- Google Analytics Campaign Tagging Disasters In The Wild: An Exposé
Learn more
You can learn more about Channel Groupings in my Analtyics Audit Template, a self-guided, 147-page audit template that is regularly updated and will teach you how to do detailed analytics audits like a pro for $295.




![What my [so-not-virginal] custom channel definitions look like](https://annielytics.com/wp-content/uploads/2015/11/my-channel-definitions.png)

